Create recovery ISO for use in a Windows Cristie BMR DR recovery situation.
The Cristie Recovery ISO Producer (CRISP) tool enables a customer to create a customised bootable disaster recovery environment suitable for use in conjunction with Cristie’s bare machine recovery (BMR) and CloneManager products for Microsoft Windows.
This document describes the steps required to use the Cristie Recovery ISO Producer (CRISP)
A typical CRISP setup sequence consists of the following steps.
- Establish which WinPE2, WinPE5 or WinPE10 version the supplied Cristie product DR environment will be built with. This will determine whether the WAIK or WADK is required.
* Note: You may build WinPE 2 and/or WinPE 5/WinPE 10 USB flash drive/ISOs with the supplied CRISP
tool. Note however that it is not possible to install both the WAIK and the WADK on the same host system
This is a restriction of those products not the Cristie CRISP application.
Download and install the Microsoft Windows Automated Installation Kit (WAIK) version 1.1.0.0 for Vista/Win2008 for WinPE 2 installation media. (x32 bit)
or
Download and install the Microsoft Windows Assessment and Deployment Kit (WADK) version 8.1 update for Win8.1/Win2012R2 for WinPE 5 installation media. (x64 bit)
or
Download and install the Microsoft Windows Assessment and Deployment Kit (WADK) version 10 for Win10/Win2016 for WinPE 10 installation media. (x64 bit)
* For use in conjunction with CRISP you only need to select the Deployment Tools and Windows Preinstallation Environment features.
All above are available from Microsoft download website
* Note: ISO creation requires Administrator privilege.
* Note: When the CRISP program starts it will confirm that the WAIK or WADK is installed
_ on the technician machine. An error message will be displayed if the WAIK/WADK is_
_ not found. It will not be possible to create an ISO in this case._
* Note: For CD/DVD ISO creation the following initial dialogue is displayed. Note the example
_ shown is an ABMR WinPE 5 DR ISO creation sequence._
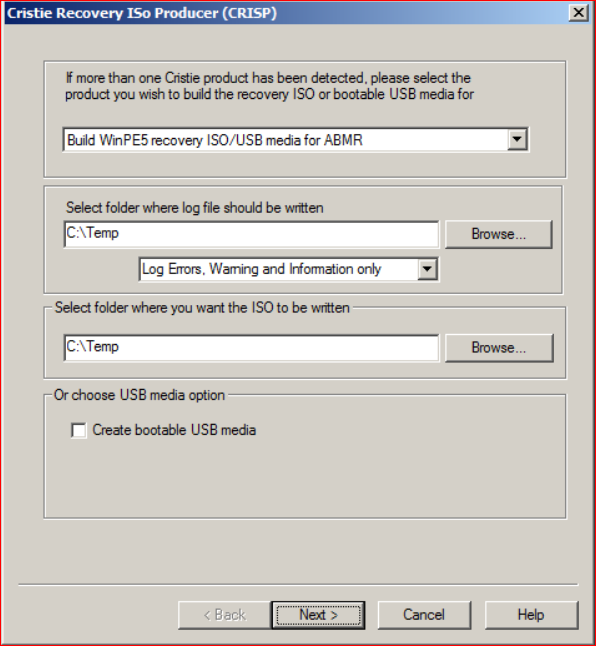
From the drop-down box select the ISO fileset corresponding to the product for which you wish to build the WinPE2, WinPE5 or WinPE10 DR environment. Normally this will offer a single choice, but is provided in case you have multiple product filesets installed. Leave Create bootable USB media unticked for ISO creation.
You may specify a folder path to define a location for the build log files. This can be a network share if you wish. Also select the level of logging detail from the drop-down box as required.
You should also specify or browse to the location of where the target ISO file is to be created. This can also be a network share if you wish).
* NOTE: For ABMR or NBMR filesets only: When creating the ISO, you will be prompted for the
_ location of the EMC Avamar or NetWorker client setup binaries. An ISO needs to be_
_ created that corresponds to the version of the EMC Avamar or NetWorker client used to_
_ create the backup._
* Note: Make sure you select the correct 32-bit version (for WinPE 2 builds) or 64-bit version (for
_ WinPE 5/WinPE 10 builds) of the EMC Avamar or NetWorker client setup binaries._
NBMR only: the 64-bit NetWorker client can be installed on the technician machine (if it is a 64-bit host OS) and the binaries pointed to here C:\ProgramFiles\Legato\nsr\bin. However, it may be more convenient to extract the required version of the Networker client download to a network share. CRISP is designed to
locate the binaries within the extracted files.
Select Browse and navigate to the location of the binaries.Create bootable environment 21

* Note: Where it is required to support NBMR in conjunction with EMC NetWorker version 9,
_ ensure both the client components lgtoclnt-9.x.x.x.exe and lgtoxtdclnt-9.x.x.x.exe are_
_ installed on the host machine prior to running CRISP to create the ISOs._
Click Next > to continue for Driver Injection
* Note: Normally you will not need to add further drivers to the build.
Click Next > to continue.
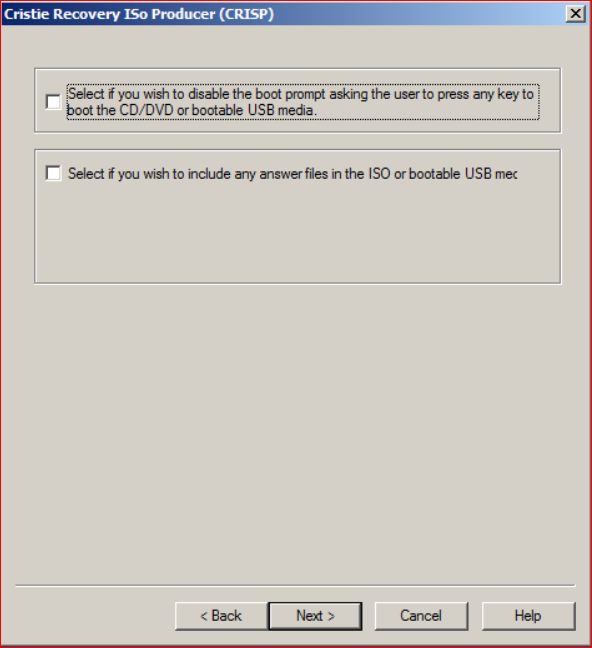
This will then display a dialogue allowing the default boot prompt mode to be selected or allow an unattended DR answer file to be included in the ISO.
Click Next> to start the ISO creation process.
Each step of the ISO creation process is recorded on-screen and in the logs. Any errors detected during the creation process will also be recorded on-screen and in the logs.24
Click on Cancel to abort the creation process. These buttons are active throughout the creation process. When the creation process is complete the following dialog is displayed.
Click View Logs to examine a record of the ISO generation process. Click Back to repeat
the ISO generation process from the beginning. Finally click Finish to exit the program. The output folder contains the ISO and the log file.
If required, you may now burn the output ISO file to physical media (CD or DVD).